Table of Contents
The user interface in a nutshell
Foreword
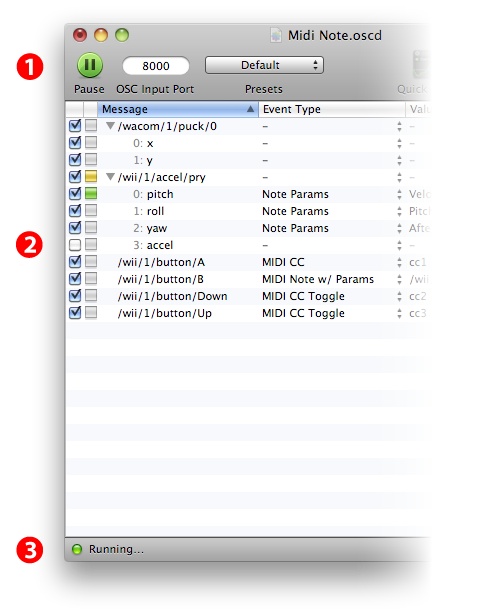
Most of what happens in OSCulator is located in the Main Window. This is what you see when you first launch the program.
This window displays the list of messages that OSCulator received so far. Events can be triggered in response to the messages' values, they can be of many sorts: MIDI Control Changes, Keyboard events, OSC, etc.
In a new document, the list is empty. As soon as a message is received, it will be displayed as a new entry in the list, ready to be configured.
Description of the main window
The main window is divided into 3 parts:
- 1. Toolbar
- A toolbar with customizable items. The default layout suggests:
- a start/pause button,
- the OSC input port number,
- the Presets menu,
- the Quick Look viewer, useful to have a visual representation of the input,
- the Parameters Window button, gives access to advanced features,
- and the Wiimote Drawer button, shows the Wiimote configuration panel.
- 2. Messages List
- The table showing the list of registered messages.
- 3. Status bar
- A led indicates the readiness status, and a label displays messages of interest to the user.
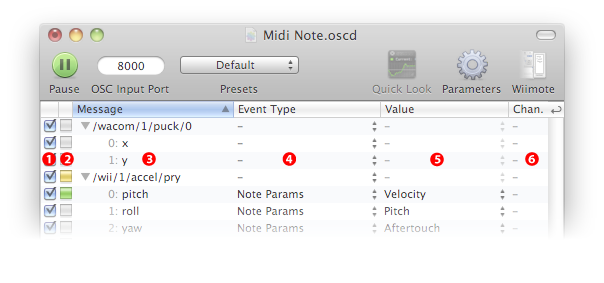
A more detailed look at the columns
- 1. Enable
- A checkbox to enable or disable the event. If the checkbox is unchecked, the associated event will not be triggered (see Routing Menu)
- 2. Activity
- An activity sensor that blinks when a value is changing. This light blinks yellow when nothing is performed, green when an event is triggered correctly and red if an error occurs. Note that the light will blink only if the input has changed for 10% more than the previous value. This columns is also sensitive to mouse clicks: clicking the activity monitor will send a default message, useful for testing if an event is correctly configured ;
- 3. Message
- This is the name of the registered message. When the disclosure triangle is down, this columns displays the indices of the arguments, or their user-friendly memo if they are available. You can edit these memos by double clicking the row.
- 4. Event Type
- A drop-down menu that shows the list of all Event Types (see Events). If you want to assign an event to a message, use this menu first, then go to the Value menu.
- 5. Value
- A drop-down menu that shows the list of all possible values for the chosen Event Type.
- 6. Channel
- MIDI related Event Types use a channel (such as
MIDI CC,Kyma CC, orMIDI Note). The channel forHID Joystickis the number of the joystick (two virtual joysticks are available).
New document
A new OSCulator document named 'Untitled' does not contain any OSC message and listens to the default OSC input port1).
In order to populate this table, you will need to send OSC messages to OSCulator, or connect a Wiimote or a SpaceNavigator. This has two benefits: test wether the connection is working correctly, and automatically learn the OSC message.
Multiple documents
It is possible to work on multiple documents, that is, multiple windows at once. This is useful when you want to separate functionality accross several files. For example, if you need to work with two different TouchOSC devices, you must separate their configuration using two different files. Though you can mix both configurations in the same file, it is easier and less confusing to manage things this way.
Two windows can not share the same OSC input port. If two windows have the same port, then one of the two windows will be not able to start the OSC engine. In this case, an error message is displayed, and the status LED turns to red.
Operation on messages
Edit Menu
Copy (⌘C) / Paste (⌘V) / Cut (⌘X)
Use the Copy and Paste functions to copy and paste messages and events between different presets or windows.
Delete (Backspace key)
You can delete one or more events by selecting them in the list and pressing the Backspace key.
If you delete a message, you will not prevent OSCulator from receiving it again. Deleting messages is useful when you want to clean up the document, or if you simply want to reset a message to its initial state.
Select All (⌘A)
Selects all messages in the window.
Duplicate (⌘D)
Use the Duplicate command to send the same message to many events.
For example, with a single button of the Wiimote you can trigger two MIDI Control Change events. For this, select the message that corresponds to the button, and choose Edit → Duplicate. This will create two entries that you can bind to two different events. You can repeat that operation for as many copies as you want of the same message.
Split (⇧⌘D)
“Split” an incoming message in two parts.
This function creates two virtual messages, one for the low values of the incoming message (between 0 and 0.5, excluded) and the other one for high values of the incoming message (between 0.5 and 1). The outputs are scaled to 0 1. This is very useful when you have the input from the axis of a controller and want to assign a different event for each sides of the axis. For example, with the joystick of the Wiimote's Nunchuk, you can assign a different event when the joystick is on the left, and another for the right.
Since version 2.8, Split is actually the same Duplicate except it automatically configures the scalings so the previously described behaviour is achieved. See scalings for more information.
Demux (⌃D)
Demuxes or “Demultiplexes” the input based on its value. This function create a new message based for each of the different values it has received. When called, the existing events will be removed, waiting for the next incoming input. The message marked for demultiplexing is colored in purple.
A simple use of that feature is to give a different event to the same Wiimote button (e.g. /wii/1/button/A) whether it has been pressed or released. Buttons usually send two values:
- 1 when the button is pressed
- 0 when the button is released
Select the message /wii/1/button/A and choose Edit → Demux, then press and release the button again. The message will become :
/wii/1/button/A
    0			-
    1			-
Be careful not to use this feature with continuous values as it can produce unexpected results.
Routing Menu
Stop/Start Routing
This menu command has the same effect as the play button in the toolbar. When the routing is stopped, OSCulator will stop receiving OSC2), MIDI, and every inputs. Connected Wiimotes are not disconnected, but they stop sending their data.
Lock Input (⌘L)
Locks the input so the message list can not be changed in any way. This function will prevent from altering the state of the running document. This is useful when you are on a live show and want to keep the document from being modified incidentally.
Solo (⌘R)
Use this command to only enable the selected events.
On first call, it enables only the selected events, and disables all the other ones. On subsequent calls, toggles between the previous state and the Solo state.
A useful example of this feature is when you are mapping MIDI Control Changes to Ableton Live. When in learn mode, Live listens to every incoming MIDI messages. Unfortunately if you are using an X/Y touchpad in TouchOSC, two MIDI messages will be sent (one for the X value, and one for the Y value). Therefore, it is needed to filter out which messages must be enabled so Live receives only one MIDI CC at a time.
For this, select the line you want to solo, hit ⌘R, and activate MIDI learn in Live. When you're done learning the MIDI event, go back to OSCulator and hit ⌘R again to restore the previous working state.
Enable (⇧⌘R)
Enables the selected messages.
Disable (⌥⌘R)
Disables the selected messages. The disabled messages will not triggered their events.
Collapse / Expand (⇧⌘E)
Collapses or expands the selected lines.
Quick Look
Pressing the space bar will display a small graph window useful to have a visual readout of the data (see quick_look for more information).
Manually Create Message…
Prompts the user with a OSC message name, and displays it in the list. This command is only useful in some very specific cases.
One of them is with TouchOSC, when configuring bi-directional communication with a control that is not able to send messages for example a label or a LED:
/1/led1),/1/led1message (this will have the effect of sending the assign MIDI message to Live),
Keeping the main window on top of all others
When you work with another software, it can be useful to keep OSCulator's window on top of all others, like a floating tool. To do that, choose “Window → Keep window on top” (⌘T).


