Table of Contents
Using TouchOSC with Logic Pro (Part 3)
In the previous part of this tutorial, we have learned how to map TouchOSC switches to Logic Pro Mute switches. This last chapter will learn you how to map Sends and plugin parameters.
Controling Sends
Insert an auxiliary send for the 8 audio tracks, you can do this quickly by select all of them then insert one send on the first one:
Turn the send knob on audio track 1 and have a look at the message sent:
As seen on the previous chapter, “F 1 28 6” means “fader 28 on channel 1 with value 6”
On the iPhone, switch to page 3, the one with red faders. Move the first one, then in OSCulator, assign MIDI CC 8 on channel 1.
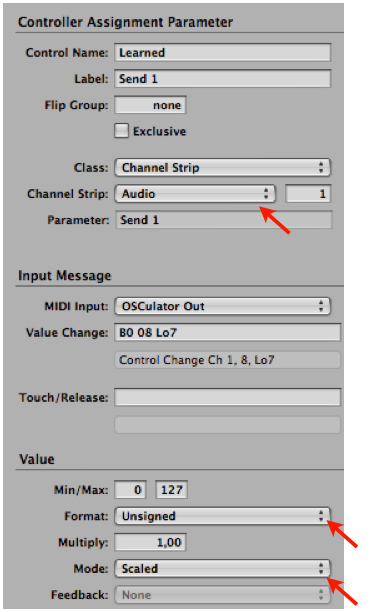
Now assign this fader to send 1 via ⌘L then adjust parameters as usual:
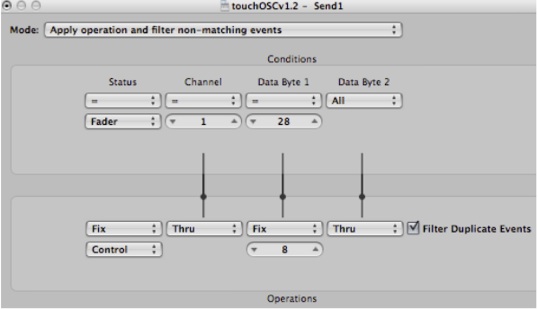
To get feedback from Logic Pro to TouchOSC, we need to create a new transformer, to change “fader 28 on channel 1” into MIDI CC 8 channel 1:
Patch it like previous transformers:
Now move the send 1 knob in Logic, you should see fader 1 moving on iPhone while a new MIDI event is automaticly created in OSCulator to handle this feedback.
Proceed likewise with audio tracks 7 to 8, but remember to change the MIDI channels in OSCulator for every fader:
Control a plugin parameter
Let's try to control a plugin parameter now.
In this example we choose to control a third party plugin inserted on audio track 1. This plugin is apEQ from Apulsoft, a great EQ plugin with many features, however it doesn't support MIDI Learn, hence a perfect candidate for this exercice.
As we did with others parameters, begin by monitoring what is sent by Logic Pro when you change parameters.
- When we move the frequency control, Logic Pro sends “fader 28 on channel2”
- When we move the gain control, Logic Pro sends “fader 29 on channel2”
Thus, we decide to use the XY controller from page 1 on TouchOSC. This one will let us control at the same time frequency and gain.
Move the XY controler on iPhone to create the respective events in OSCulator, then in OSCulator, assign MIDI CC 9 and 11. Don't use MIDI CC 10 because, just like MIDI CC 7, Logic Pro will automatically route it to the Pan control of the selected track.

/1/xy with its 2 arguments.

X axis is vertical and Y axis horizontal. So to stick to apEQ display, we will assign X to gain and Y to frequency.
Before launching the MIDI Learn process in Logic Pro, we will solo one axis (let's say X) to make sure Logic Pro will receive only the MIDI CC we want to assign to Frequency. OSCulator's solo function is activated via the Routing menu, or with the ⇧⌘R keyboard shortcut:
Once X axis is soloed (MIDI CC 11), engage MIDI Learn in Logic Pro by pressing ⌘L. As usual, change the parameters like this:
Now, in OSCulator solo the Y axis, and repeat the previous procedure in Logic:
You can create a transformer to get feedback but it won't be easy as this plugin send values beteween 0 and 100, so you will have to scale 0-100 to 0-127. Once again, the transformer can do this.
But it's not sure wether it will be useful as this plugin won't send the freq value unless you click on the spot, moving the spot is not enough.
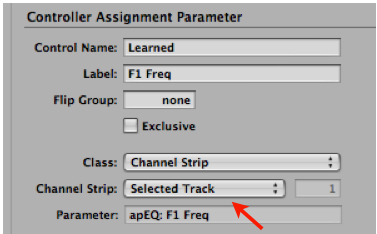
If you can live without feedback, there is a nice feature we could use in Logic Pro:
If we choose “Selected Track” instead of “Audio”, your iPhone will control Frequency and Gain for any audio track, as long as you insert apEQ in the same slot number. Combined with the “chain” feature in Logic Pro plugin's window it will be very easy to navigate thru tracks in arrange while adjusting the EQ on the iPhone.

F …) when you move a knob on a plugin, this is not a bug, but a plugin with no controllable parameter.
We hope you enjoyed this tutorial and wish it will encourage you to create your own setup. You can download the companion files to this tutorial here.


