−Table of Contents
Wiimote
Connecting the Wiimote
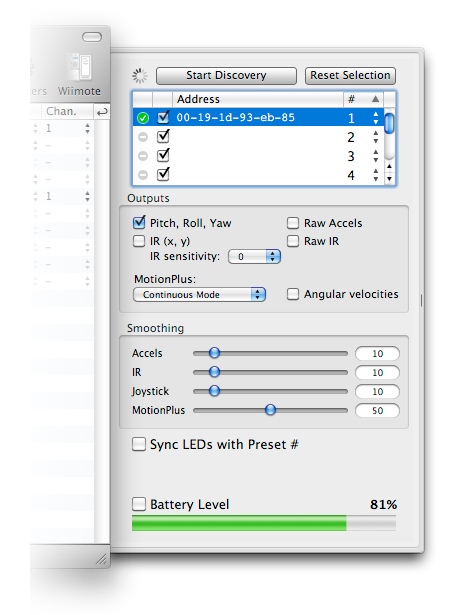
By default OSCulator starts scanning for Wiimotes1) on launch. You can change this behavior in the Preferences. If the spinning indicator is not running, press the “Start discovery button”. The following message will be displayed in the status bar:
To connect the Wiimote to OSCulator, press buttons 1 & 2 and wait a second. Once messages begin to flow in the main window, you'll know the Wiimote is connected. A green checkmark icon is also displayed in the Wiimote drawer.
If an error occurs, a message is displayed in red in the status bar. For example, errors can occur when the Wiimote is low on battery. If the Perfect Pairing extension has been installed, you should never get a message2).
Using the Wiimote
Wiimote's slots
You can choose the slot number assigned to the Wiimote by clicking on the drop down menu displayed right to the Wiimote address field. This is useful for using several Wiimote at a time. Note that you can connect up to 4 Wiimotes simultaneously. Some recent Mac models can accept up to 7 Wiimotes.
Messages
Just like every messages, simply configure the events you want to perform. For example to send a MIDI Control Change that has the value of the Wiimote acceleration, locate the line that is labelled “accel”, select “MIDI CC” in the Event Type column, and choose any number you like from the Value column.
The Wiimote messages are labeled as follows:
→ /wii/[wiimote id]/{extension device/}[control type]/{acceleration type}
Here is what it means:
- first, we have the
/wiiprefix - next, the number assigned to the connected wii
- optionally, if an extension device is connected, its name, which can be
nunchukofclassicfor the classic controller - the control type, which can be
button,accel,ir, orjoy(for joysticks) - finally, if the control type is an acceleration, the accerelation format, which can be
xyz(for the X, Y and Z axes of the Wiimote or Nunchuk), andpry(for Pitch, Yaw, Raw and Scalar acceleration)
- for the
xyzacceleration control type, there are 3 arguments, which correspond to the respective X, Y and Z accelerations. - for the
pryacceleration control type, there are 4 arguments, which correspond to Pitch, Roll, Yaw, and the Scalar acceleration (combination of all the accelerations, which gives a meaning of the strengh of the movement applied to the Wiimote.) - for the
ircontrol type, there are 2 arguments, which are the X and Y coordinates. - for the
joycontrol type, there are 2 arguments, which are the X and Y coordinates of the joystick. - if you have enabled Raw IR output, you can track up to 4 IR points (like IR LED or a mere candle). The suffix
xysis added with the number of the tracked point. 3 actions are assigned to this OSC message, which are respectively the coordinates X and Y, and the size of the point, S.
Filtering output
You can choose to output only a part of the data given by the Wiimote. To do this, click on the checkboxes matching the data you want to enable or disable in the Wiimote drawer.
You can choose between:
- Raw Accelerations (x, y, z)
- These are the acceleration values as measured by the accelerometer chip of the Wiimote.
- Pitch, Raw, Yaw, Acceleration
- These values represent the orientation of the remote. These values are derived from the x, y, and z accelerations. The last information, Acceleration, is the scalar value (overall value) of {x, y, z}.
- IR
- These values represent the x and y coordinates of an imaginary point to which the Wiimote is directed.
- Raw IR (x, y, size / 4 tracked dots)
- These are the values as given by the built-in infrared camera. The Wiimote can track up to 4 dots. Their x, y coordinates are reported as well as the sizes of the dots.
Smoothing out the data
If you feel like the Wiimote output is too jerky, you can smooth it out by applying a filter on it. Simply adjust the sliders to taste. A value of 0 means “no smoothing”, whereas a values of 100 means “maximum smoothing”.
How the settings are saved
The settings you customize in the Wiimote drawer are saved in the OSCulator document you are working on. This is useful to take you settings with you if you change of computer.
However, the Wiimotes addresses and their mapping numbers are stored in the Preferences of the application. Hence, this configuration is stored on the computer that is running the application.
Sync LEDs with Preset #
If you are using many presets, you can make the LEDs display the preset number instead of the Wiimote number.
Troubleshooting
There is a bug in the Mac OS X implementation of Bluetooth that makes the Wiimote connection difficult on some computers. However, since OSCulator 2.5.1, an add-on to your system can be installed in order to prevent this problem to arise.
The most affected are G4 and G5 based computers running Mac OS X Tiger (10.4).
On first launch, you will be automatically guided through the installation of the Wiimote called the Perfect Pairing Extension. You can still choose to revert the changes in the Preferences window.
Kyma Users: Obtain the Sounds
Follow this tutorial written by Carla Scaletti to learn about how to use the Wiimote as a direct controller for the Kyma Workstation. All users, whether they own a Kyma or not are encouraged to read this tutorial as it can help to learn how to use the Wiimote with OSCulator.


