Using TouchOSC with Logic Pro (Part 2)
In the first part of this tutorial, we have learned how to map TouchOSC faders to LogicPro Volume faders. Now, we will implement Mute switches control via TouchOSC buttons.
First, we have to know what the Logic object Audio 1 sends when its “mute” button is pressed or depressed. Let's have a look at the “monitor” we have previously created.
We read “F 1 9 1” and “F 1 9 0”. What kind of MIDI message is this? Actually it is not MIDI, it is a proprietary message only used by Logic objects and it is called “Fader Message”. The good news is Transformer objects can manage this kind of message as well.
Back to your iPhone. Press button 1 on iPhone, OSCulator will create a new event, assign it to MIDI CC 5 and Channel 1.
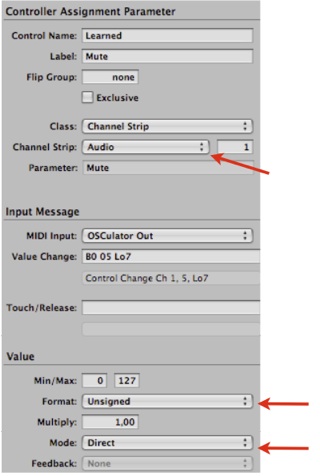
Press Mute on Logic Pro audio Track 1 and then ⌘L to bring up the MIDI Learn dialog.
Press the toggle button on iPhone TWICE until this field display “Lo7”, if you see 0 or 127 it means it won't work properly.
Quit “Learn Mode” and modify the parameters like this:
Then proceed one by one with mute buttons 2 to 8.
Don't forget to increment MIDI channels in OSCulator.
Now it is time to setup MIDI feedback from Logic Pro to TouchOSC.
We will use a Transformer once more to turn “Fader” messages into MIDI Control Changes.
Create one transformer, name it “mute”, open it then set parameters like this:
The process is a little bit more complex than for mapping the Volume faders. We want to turn a “Fader” message 9 on channel 1 into a MIDI CC 6 on channel 1 and we use a custom mapping.
This mapping will send 0 for entry 0 and 127 for value 1.
Please cable this transfomer just like we did for volume:
Turn ON or OFF mute on audio track 1, you should see a new event in OSCulator:
Duplicate transformer “mute” for the 7 lasting tracks:
Press mute on every audio track and it will create more midi event in OSCulator:
That's it! You have now a bi-directional mapping between TouchOSC buttons and Logic Pro mute switches. To learn how to control SendS and plugin parameters, follow the third chapter of this tutorial.


