Use your iPhone or iPod with Ableton Live
This tutorial explains how to control a MIDI enabled software like Ableton Live from your iPhone.
## Live configuration
First, launch OSCulator and Live.
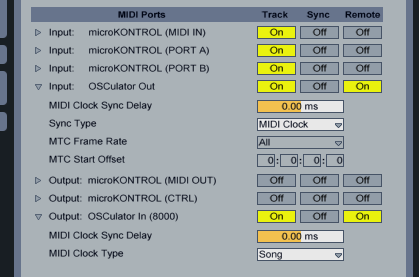
In Live, open the Preferences, go to “MIDI Sync” tab and enable the Track and Remote columns for “OSCulator Out” and “OSCulator In” interfaces. This will enable us to record events and send control events to OSCulator as well.
## TouchOSC configuration
Now, launch TouchOSC on your iPhone.
Please make sure you have latest version installed.
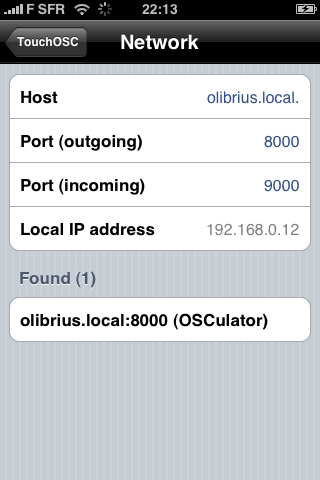
* Click on the button under “Network” and choose the option corresponding to OSCulator (see picture above). TouchOSC will automatically fill the fields required for the network communications.
* In the “Port (incoming)” field, enter 9000. This can be actually any port number you wish. 9000 is cool.
* From there your settings page should look like this (your “Host” field can be different, due to network configuration differences).
* Select a layout, we will use “Beatmachine”.
* Click on the “Done” button and leave TouchOSC running.
—-
## OSCulator Automatic Configuration
From there, we can either load a template or configure OSCulator manually. If you prefer to “plug and play” with MIDI, just use the template corresponding to the layou you chose (Beatmachine in our case). It is located in the Sample Patches folder of the OSCulator folder you installed on your computer.
Once you’ve loaded a template file, click on the Parameters button on the toolbar and go to the OSC Hosts tab. Set the “Default Host” to the one corresponding to your iPhone (it should read ‘TouchOSC’ in the name).
You can also learn how to make such a template by reading what’s following.
—-
## OSCulator Manual Configuration
We will configure the yellow slider so it can control the volume of the first track in Live:
* Touch the yellow slider to send an initial event.
* The event “/1/fader” should appear in the main window of OSCulator.
* In OSCulator, select “MIDI CC” as Event Type, and “0” as Value (well, the first value in the list).
Now, let’s tell Live we want to use this MIDI control change to control the volume fader of the first track. This procedure also works for any button or control in Live.
* Return to Live, and click on the MIDI button, located upper right. Live turns to MIDI Learn mode.
* Click on the volume fader of the first track. The track should now look like this:
* In TouchOSC, touch the yellow slider again. This will forward the event to Live, which will learn that we want to use the MIDI control change 0 to control the volume fader. A “1/0” label is now displayed next to the volume fader, like this:
* Leave MIDI learn mode by click on the MIDI button upper right.
* You’re done!
If you click the volume fader in Live, you will notice OSCulator will automatically detect a MIDI message and will convert it to an OSC message that it sends to TouchOSC running on your iPhone.
That means that TouchOSC and Live are synchronized both ways.


